Apps that use barcode scanners are really useful. It’s difficult to physically type in all the numbers of a UPC code (inevitably, I miss one).
And, with all the free cloud databases available it’s super easy to pull the info you need after scanning the barcode.
I created a simple app that uses a barcode scanner to grab the EAN of a book, connects with the Google books API, and pulls the data for that book from the API.
Here’s how it works:
First of all, while we could create a barcode scanner from scratch, it’s difficult. Also, pointless, because there are a few good (and free) barcode scanning libraries for Android that we can just include in our app. Why reinvent the wheel?
So, I used zxing.
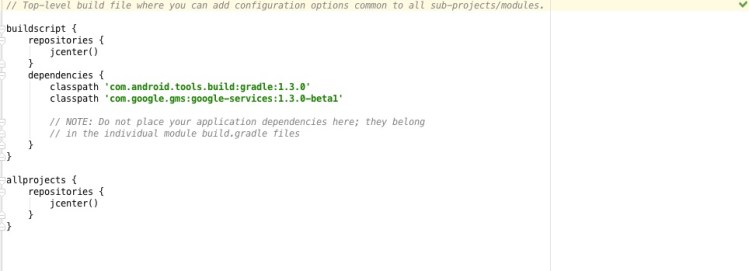
Here are my app level build.gradle dependencies:

(At the time of development, 1.8.2 was the latest release. Please review the github account for more recent releases).
Once zxing is declared as a dependency we’ll be able to use the barcode scanner in our app. Zxing provides support for UPC-A, UPC-E, EAN-8 and EAN-13 codes. We will be using EAN-13 codes.
Moving on. Our use case is that our user wants to add a book to their app’s book library by scanning a barcode. Here is the interface design:

Here is the “Add a Book” screen (or activity). Pressing the “SCAN” button launches this screen:

Once the UPC is captured, it is returned to the launching activity:

Let’s walk through the code!
First of all, we have to find the scan button from the layout and assign it some functionality, which is what we are doing here in the onCreateView method of the AddBook activity:

(While this works for our purposes a release app should really save a reference to the scan button into an easily accessible data structure rather than access rootView every time onCreateView is called.)
The code is straightforward. We have to check if there is internet to avoid errors and crashing :-(. Then we launch the CameraActivity for a result (which calls back to an onActivityResult method in this class).
Here we are in the CameraActivity:
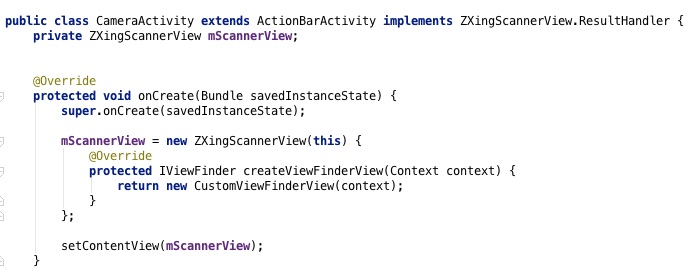
The first thing we need to do is implement the ZXingScannerView.ResultHandler interface (Android studio will complain if you make the declaration and don’t write a handleResult method).
Then, we declare a ZXingScannerView, mScannerView, which will allow us to capture the EAN with the camera.
In onCreate we initialize mScannerView by passing in the CameraActivity as the ResultHandler parameter (the “this”). And, we implement the necessary functionality of createViewFinderView by simply returning our own CustomViewFinderView.
Finally, we call setContentView with the mScannerView we just initialized. Now the barcode scanner will be working!
Here is our custom view class:
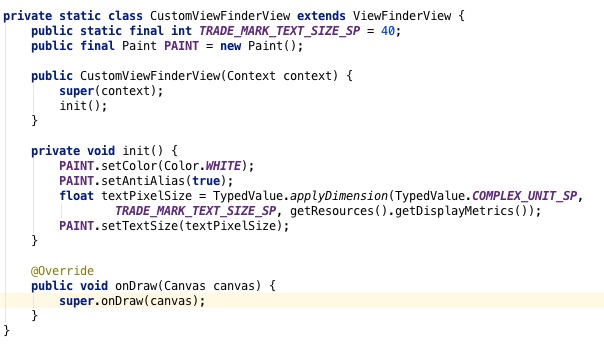
The details aren’t particularly interesting; it draws the view finder on top of the camera view.
Once the mScannerView has captured the EAN, it has to handle the result- hence the reason why we had to implement ResultHandler. Here is the ResultHandler method in our CameraActivity:
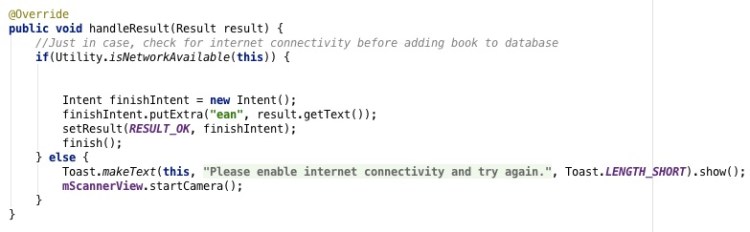
We initialize a new intent (finishIntent) and put the resulting EAN into it (the call to putExtra). By calling setResult() and then finish(), we are returning the finishIntent to the calling activity (AddBook). Finally, our scanned EAN will be available to the AddBook activity. But, we’re not done yet!
We need to do something with the returned EAN… If you look at the user interface above, all we need to do is fill the search text box with the EAN. Here’s how we do that back in AddBook:

The CameraActivity returns the intent to AddBook. We need to make sure that the data exists, otherwise the app will crash. Then, we pull the EAN from the intent and store it in the variable scannedEan. Once we get the string from the intent, we call setText() on the global variable “ean” (which refers to the search textbox). Finally, we refresh everything.
And there you have it!
You can see all my code at the github repository here.